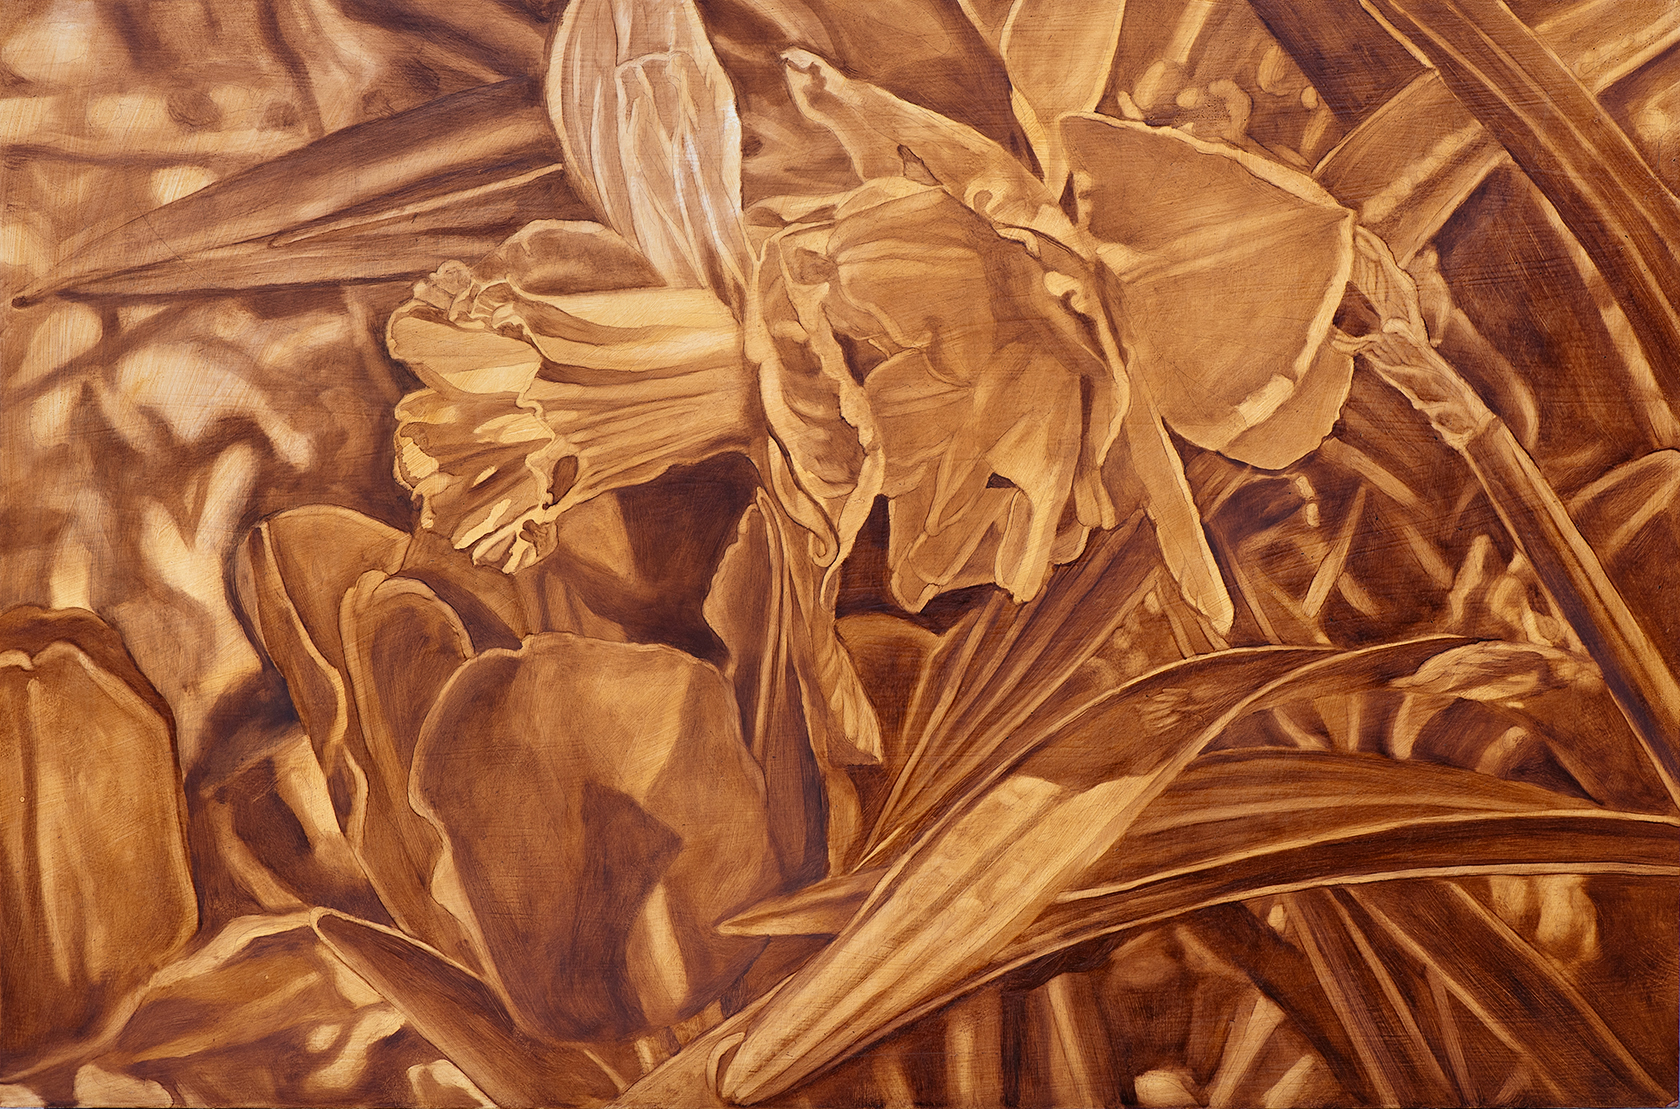

Above top: Paul Baldassini “Smith College Spring Bulb Show No. 4”, underpainting, oil on panel, 2025; bottom left: Peter Paul Rubens “The Lion Hunt”, 1621; right Leonardo DaVinci detail from “Virgin of the Rocks”. 1483-1486.
NOTE: This post was prepared and edited from a monograph I wrote more than 10 years ago. -P
There are many ways to create a realistic oil painting, and no single approach is best. Your method will reflect your painting style and personality.
I paint to bring beauty into the world and into people’s lives. By painting flowers larger than life, I use the power of scale to draw attention to special things that often go unnoticed. And, even though I paint in the genre of Florals & Gardens – sometimes Landscapes – using oil paint, artists using any media to paint any subject matter can benefit from utilizing an underpainting. Painting is hard work. I think its easier to get the composition, value and tonal considerations out of the way first and then focus almost exclusively on color mixing, temperature, edges and light. Like any other manufacturing process – there is a logical series of steps that, if implemented correctly, results in a quality product that exhibits longevity, durability, and owner satisfaction. Many works, but not all, have withstood the ravages of time – atmosphere, light, environmental pollutants, and other damaging and harmful conditions, for over a thousand years, because the artists and craftsmen who created them cared enough about their materials and working methods to ensure generations of viewing pleasure with virtually little or no maintenance. I feel that way about the materials and techniques I use to create a painting, and I hope you do too.
Since I prefer painting in a structured, organized manner, I needed to study the techniques of the Old Masters rather than, say, those of 20th-century modern masters, whom I also admire.
According to authors Sylvana Barrett and Dusan C. Stulik, in The Getty Conservation Institute in Historical Painting Techniques, Materials, and Studio Practice, published by The Getty Conservation Institute, Marina del Rey, CA, there are four historical approaches to realistic oil painting:
No. 1: Basic technique – direct painting approach. In this most basic and very effective technique, the artist, using a small brush and carefully placed single strokes, applies light- and dark-valued color mixtures directly onto the prepared panel, which has already been coated with a brownish-yellow imprimatura and umber underpainting. Dark values indicate shadows, and light values indicate highlights. There is no blending of similar-valued paint strokes into the surrounding pigments, and the surface reveals clearly defined individual brush strokes that retain their original color mixtures. Works by the 14th and 15th-century Italian painters, including Cimabue, Giotto, Vivarini, Fra Filippo Lippi, Fra Angelico, Sassetta, Mantegna, Ghirlandaio, and Botticelli, are prime examples of the basic technique.
No. 2: Transparent oil technique. Although the beginnings of oil painting are recorded as early as the 12th century in Northern Europe, it was the virtuoso handling of the medium by the Flemish and early Netherlandish masters that marked a major turning point in its adoption as the dominant painting medium in Europe. In this more complex technique, artists soon discovered that the oil and pigment admixtures made most pigments translucent, allowing them to apply their colors in thin layers, or glazes. The result was the rich, glowing colors often associated with the portraits of Jan van Eyck, Robert Campin, and Rogier van der Weyden.
No. 3: Highlighting with impasto white. In this technique, the artist tones the surface with a thin yellow- or reddish-brown layer, called an imprimatura, meaning “first paint layer” in Italian. An underdrawing serves as a rough guide; the artist directly sketches the image with a small brush and thinned paint, restating lines as needed to refine the composition. A white-and-gray-toned underpainting follows, often employing very thick impastos for the main subjects—usually figures. Objects that will appear lighter and are less thickly painted or finished than the figures. Once dry, the lead whites are painted over with translucent veils of color, called velaturas, and transparent glazes, softly blended into darker glazed passages. Exponents of this technique include Titian, the influential Venetian painter, and Peter Paul Rubens, the Flemish master from Antwerp.
No. 4: Direct painting and surface blending. In this technique, the artist mixes individual colors and values on his palette, carefully applying them and blending them on the surface with gradual transitions from highlight to shadow. The underpainting serves no purpose other than as a guide for the painting on top and never interacts with the surface layer. This technique favors smoothly modeled gradations with no visible brush marks, as each successive layer of paint is applied and carefully blended into the surrounding paint. Notable master painters of the last of the four historical approaches to realistic oil painting are the French masters Jean-Auguste-Dominique Ingres and Jacques-Louis David.
Thus began a life-long investigation of the materials and methods used by these old master painters, which has not yet ended. After years of trial and error and experimentation with all four historical approaches, it was the techniques of the 16th- and 17th-century Italian and Flemish master painters that resonated with me. I realized that the main difference between their painting techniques and modern painting techniques is directly related to the oil mediums that were employed, whatever they were, AND to how they broke down their working procedures into a series of distinct passages executed in a predefined order.
As a realist painter concerned with light effects and the illusion of volume, the underpainting technique greatly facilitates both the realization of a compelling composition and accurate depictions of light and chromatic subtleties – the design and composition are completed well in advance of the overpainting.
My technique closely mirrors that of the old masters, yet is distinguished by a modern, contemporary style honed through years of study and experimentation. Inspired by Italian and Flemish masters, I explored their methods through books and museum visits, seeking to understand how they created luminous paintings. A pivotal moment was experiencing works by Titian, Tintoretto, and Veronese in Paris (1990), and by Rubens and his contemporaries in Brussels (1993). Rubens’ monumental canvases, smaller panel works and studies captivated me with their energy, rhythm, and bravura brushwork. Notably, his paintings featured mid-toned canvases brushed diagonally, visible white grounds, and dynamic, loosely sketched compositions blocked in with thin paint. He built up lights with smooth, layered strokes, while transparent shadows revealed the underpainting. At that time, I worked only in watercolor but was deeply inspired to adapt these techniques into my own developing interest in oil painting.

left: Detail from Peter Paul Rubens’ “A Lion Hunt”, National Gallery in London, painted in 1614-15. The artist’s bravura brushwork is evident in this masterfully executed underpainting. Note the use of opaque white passages for highlighting and the complete absence of any underdrawing.
Tackling all the problems of painting at once makes things needlessly difficult. It’s more effective to first address composition, value, and tonal decisions, then focus on color mixing, temperature, edges, and light. Using these steps, combined with direct painting, a bit of glazing and scumbling, can produce luminous results efficiently. This method also facilitated atelier-style production, typical of Rubens’ studio production, by allowing master-trained assistants to handle different stages of the painting.
As I continued to study more art at museums throughout Europe and the United States, I discovered that nearly all, if not most, of the master Italian and Flemish painters used some form of warm brown umber or gray underpainting, completing their compositions with color overpainting in various techniques.
Paolo Veronese, for example, made fully realized tonal underpaintings, modeled the forms using white lead and raw or burnt umber, then glazed on color using paint and medium. Vermeer used the same underpainting style, then laid in masses of translucent body color, blending with soft brushes, adding thick white lead highlights and darkening shadows as needed. Anthony Van Dyck, a contemporary of Rubens, was renowned for his extraordinarily detailed and glowing portraits, sweeping landscapes, and fabrics featuring loose, fluid brush strokes. These works were painted much in the same broad-handed manner as his master, but with a mid-tone gray ground instead of yellow.
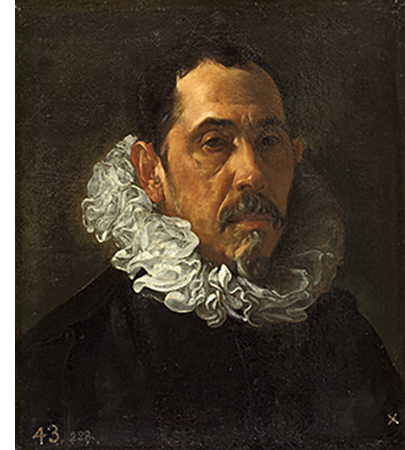
right: “Francisco Pacheco”, 1620-22. Oil on canvas, by Diego Rodríguez de Silva y Velázquez (Spain). Not much is known about Velázquez’s technique. It appears that he executed his works directly on the dark ground of the canvas, or used a thinly-applied sketchy underpainting tone on a dark ground with brown iron oxide (natural brown ocher). This was a classical technique for oil painting. Rembrandt, Carravagio, and others used it for strong chiaroscuro effects. The dark ground serves as a base for shadows, while other areas are built up in layers of more fluid color and varying opacity. The collar was painted with soft, fluid brushstrokes using lead white, drawing our attention to the figure’s face.
Like all painters working in this manner, the range of materials was limited. The subtleties of color and color design relied on pigment mixtures with a magic medium and a systematic, multi-layered application of paint. This working method was standard in Antwerp and in the surrounding areas of the 17th-century Low Countries of Europe and can also be seen in the works of Italian master painters as far back as the late 16th Century.
The master painters have been utilizing the same basic underpainting technique, variations on magic mediums, and creating overpaintings to suit their own palettes and painting styles for centuries: Breugel, Leonardo, Pontormo, Fiorentino, Parmigianino, Bronzino, Manfredi, Titian, Caravaggio, Velázquez, Rembrandt, Janssens, Spranger, Hals, Snijders, and Zurburan. The list includes many more.
My underpainting colors and technique
There are many colors that can be used for a successful underpainting – it’s up to the individual painting style. The old master painters made use of pigments available to them of the day, mostly earth ochers and umbers. For a long time, I used two underpainting colors, Quinacridone Magenta, which is a great choice if the composition is dominated by landscape greens, and Raw Umber for floral works, both painted directly on the white ground with no imprimatura. After years of experimentation, I have settled on using Raw Sienna for the imprimatura and Burnt Umber for the actual underpainting. Both are lightfast, transparent, fast driers, and offer a complete tonal range from very pale to rich and deep. Having experimented with all four historical approaches, my technique for floral works is a hybrid utilizing a structured approach that includes aspects of all of them: a detailed drawing in graphite, on top of which is applied a Raw Sienna imprimatura, then a complete monochromatic underpainting in Burnt Umber, over which a full-color overpainting is executed.
When dry, after three days or so, I begin the overpainting. Darker passages are applied transparently and thinly using color admixtures and Oleogel Medium with larger brushes. These passages interact with the underpainting, creating subtle depth; lighter passages are painted directly with more opaque paint, completely covering the base layer. Mid-tone transitions are softly blended from the darker to the lighter passages using semi-transparent velaturas. Complicated, lighter-appearing parts of the composition, mostly blossoms, are initially blocked in using admixtures containing an opaque warm white, then blended over with a Scenic Fitch bristle brush.
Next, I begin the final modeling of petal, leaf, and bud forms using smaller brushes and more opaque colors with warm white (a white pigment with added yellow for warmth). I avoid pure Titanium White, a bright, cool white pigment, at this stage, because it produces chalky colors. Instead, I chose a warm Brilliant Yellow Extra Pale, a distinctly warmer opaque white paint. The work progresses in four- to six-hour sessions, moving top-left to bottom-right until the composition is completed. After drying for a week or more, I use a cooler pure Titanium White to “light it up,” restating and blending the lightest lights of all petals in direct sunlight. Transparent glazes may also be applied as necessary to improve values and or hues in selected passages. Below is my typical sequence from start to finish.
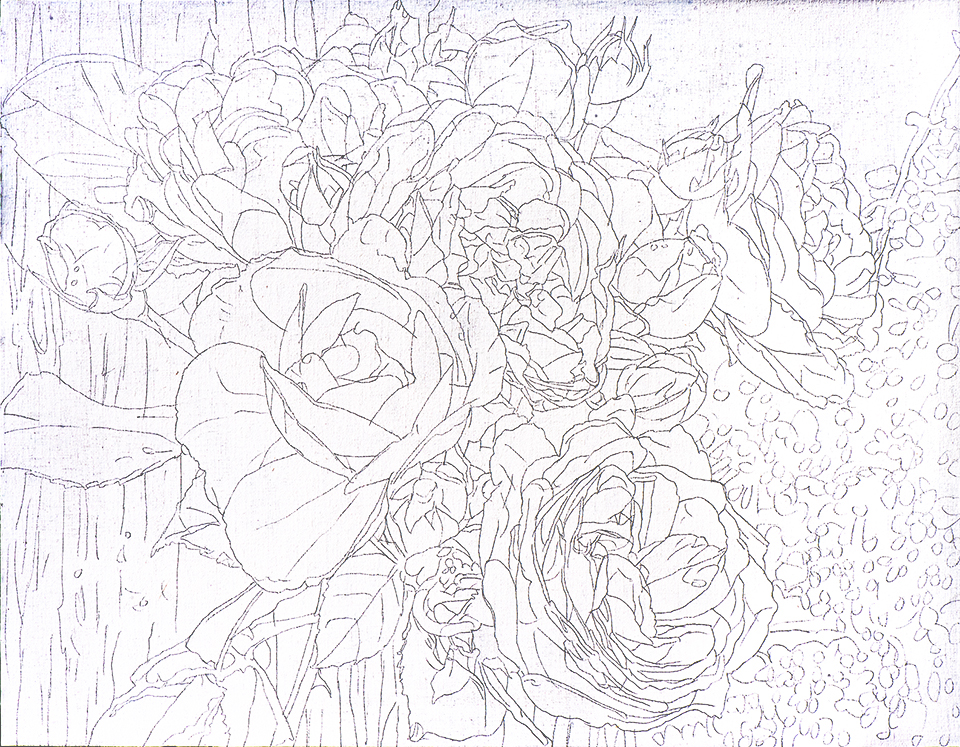
I use a 3B graphite pencil via a professional 1080p Digital Projector to draw key shapes and details directly onto the panel. This is the most important part of the process and may take up to three hours to complete. The drawing you see here has been adjusted to make it more visible on this post – it appears much lighter on the primed panel.
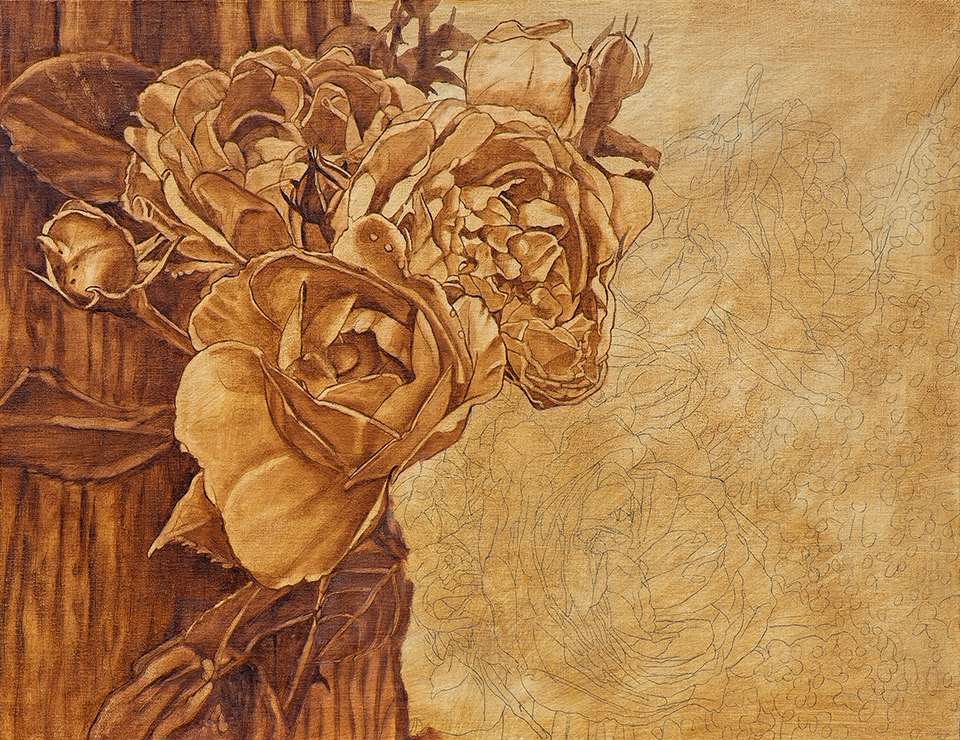
An imprimatura using Raw Sienna and a small amount of odorless mineral spirits is applied over the drawing. After drying for two or three days, I begin the first underpainting session using Burnt Umber thinned with a small amount of Solvent-Free Fluid. Gamsol odorless mineral spirits is used sparingly to remove areas of the Burnt Umber underpainting as necessary, down to the Raw Sienna imprimatura. The Solvent-Free Fluid keeps the underpainting “open” and quite fluid throughout the session without drying, making paint easily removable, reapplyable, and blendable as needed. The drawing, which is visible on the unpainted right side, remains visible through the transparent Raw Sienna imprimatura.
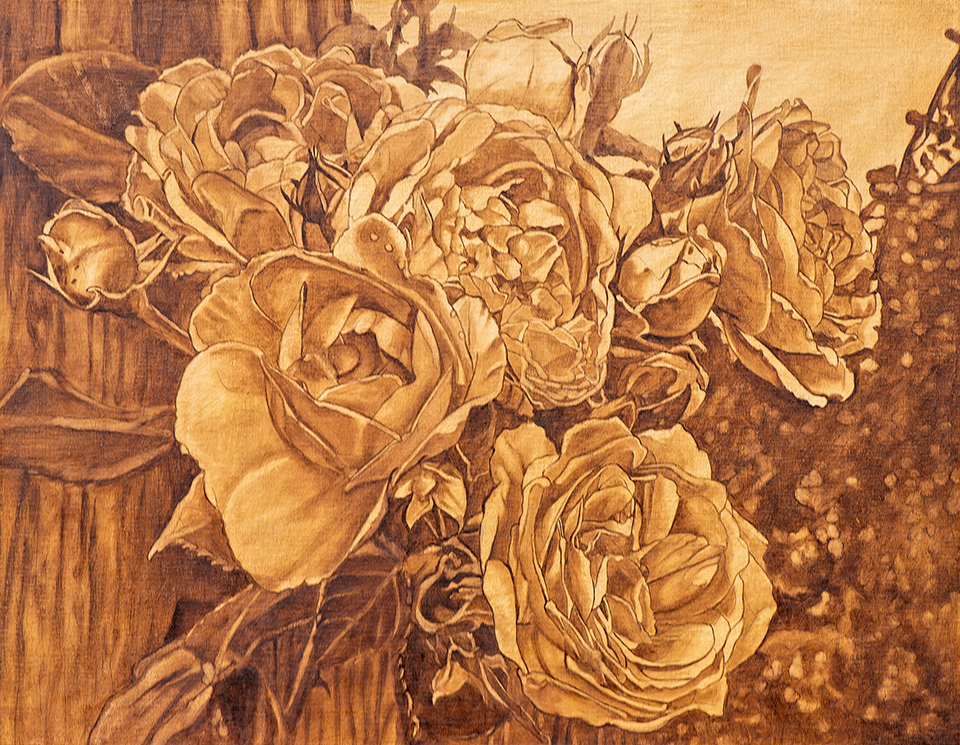
The underpainting is completed after the second session and will be left to dry for several days before the overpainting begins. There is not a trace remaining of the drawing underneath.
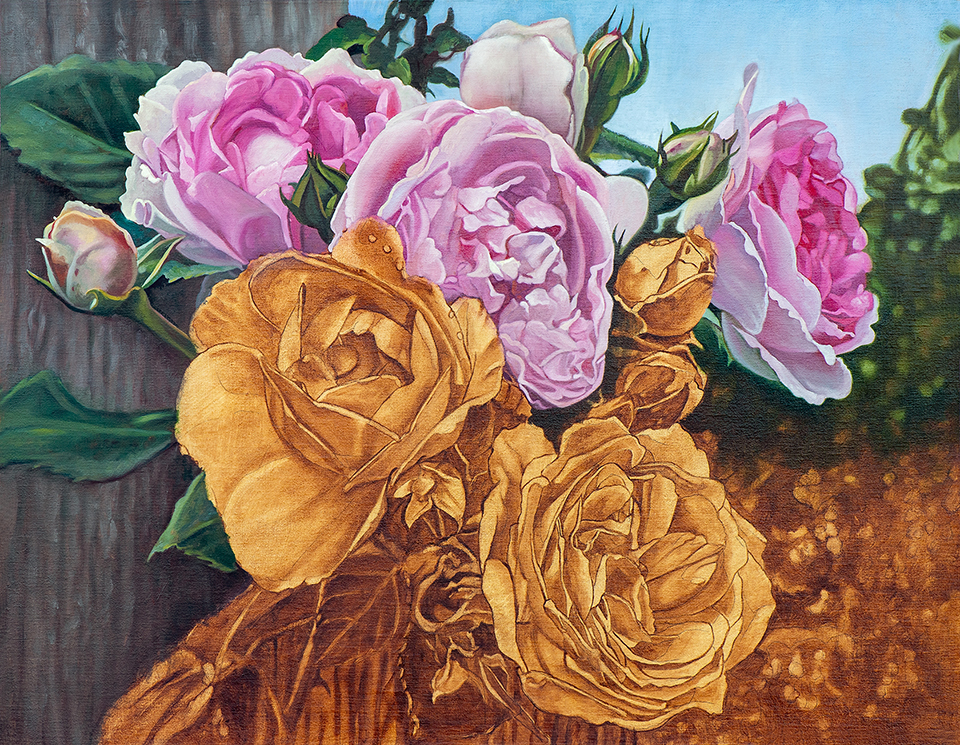
The overpainting begins using a full palette of 24 colors plus Titanium White and Brilliant Yellow Extra Pale. I use a variety of brushes, including Filberts, Egberts, and Flats. My painting technique combines a block-in with passages carefully blended with a Scenic Fitch brush before fully completing petal details. The painting medium for floral overpainting is Oleogel, an acceptable substitute for the unsurpassed Flemish Maroger Medium, which I no longer use due to lead toxicity concerns. About the only “toxic” material I continue to use is Odorless Mineral Spirits, because nothing quite works as well for cleaning brushes.

The completed painting, Little Climbing Beauties No. 3. Oil on mounted linen panel 24.5 x 31.5 inches, after the 2nd session. Many of the lightest appearing petals have been “lit up” using pure Titanium White, either full-strength or in muted admixtures. After drying over a period of 3 – 4 weeks, one coat of Varnish, mixed 50-50 using both Satin and Gloss varnish, is applied.