
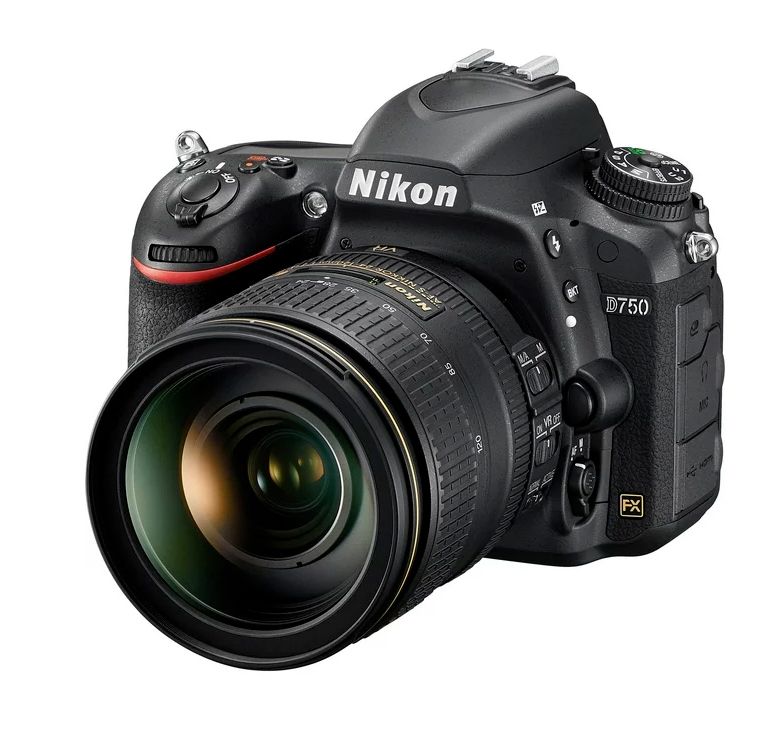
PB shooting peony close-ups in the field. My camera is a Nikon D750, a solid full-frame DSLR with a 24.3 MP sensor and excellent built-in flash. The lens is an AF-S VR Micro-NIKKOR 105mm f/2.8G, a superb all-around lens with macro capability yielding razor sharp images with a very pleasing bokeh when shooting shallow depth-of-field. Here, I am bypassing the built-in flash and using Nikon’s R1C1 Wireless Close-up Speedlight System mounted directly on the front face of the lens.
NOTE: This post was prepared and edited from a book I designed, wrote and attempted to publish in 2017. -P
Up until recently, and since I began painting “invented” tonalist landscapes, I have always used a camera to collect my reference material for paintings – film based for a great many years (35mm slides only) until I switched to a digital DSLR in 2006.
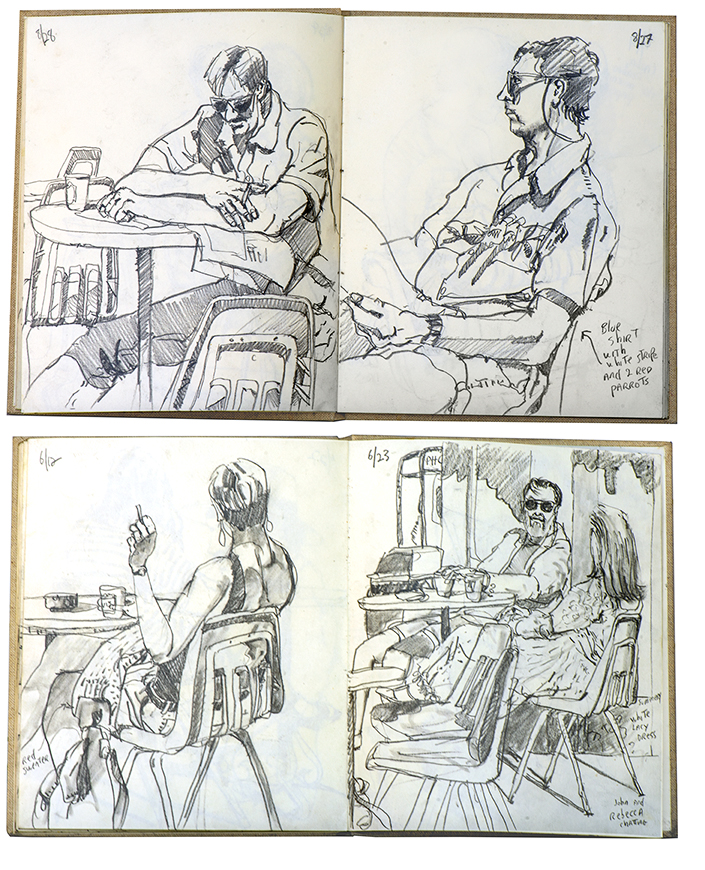
left: PB sketchbook pages from 1988 and 1991. I practiced the art of “fast sketching” using a 2B pencil and rolled paper stomp, every morning for many years the Travis Café, right around the corner from my Boston studio.
There are two often used methods for collecting and developing source material for paintings:
1. Drawing and sketching
In another life I owned and managed a graphic design business in Boston where I spent about an hour or so every morning sketching the locals and tourists at the Travis Café, where I had my morning coffee, along with collecting photographic reference material. It was there that I mastered the art of the “fast sketch” and learned how to capture the idiosyncratic gesture of a subject in less than 10 minutes with a pencil, or instantly with a camera. For the sketches I used clothbound linen sketchbooks manufactured by Sennelier, only available through their art store in Paris, France. Nearly all were done with a No 2B Mars Staedler pencil, and a couple of paper stomps, sometimes pen & ink. I have a great many sketchbooks from those days and its fun to look through them every now and then.
There is great value to be gained from drawing and sketching – both are very important and I cannot urge you strongly enough to find any way you can to draw or sketch from life, forcing you to distill a subject down to its essence rapidly and without intellectualizing the content in any way. Knowing how to draw well can only serve to help you more effectively interpret your subject. Whatever your subject, capturing the “gesture” of your subject is very important, capturing a likeness less so, in my opinion. You’ll also find that your unique mark making informs your painting style and brushwork. In fact, I don’t really distinguish much between painting and drawing, its all just marking marks. But whether your source material comes from sketching, drawing, field studies or photography, the one thing you need to be aware of and knowledgeable about is the light, especially if you’re going to be using a camera to record images.
2. Photography
My tool of choice for recording source material is a high-quality DSLR (Digital Single-lens Reflex) camera. It is used solely for the recording of information that will be processed to produce a high-quality reference image that will then be used to execute a representational work of art. You don’t have buy a new one or spend a lot of money. For years I used an older model Nikon D90 that I bought online for less than $200. Today however I use a Nikon D750, a solid full-frame DSLR with a 24.3 MP sensor and excellent built-in flash. In addition you’ll need two or more lenses, depending on what you like to photograph. My all-around go-to lens is an AF-S VR Micro-NIKKOR 105mm f/2.8G, an extremely high quality lens that also offers macro (close-up) capabilities which is a must for floral photography. I often shoot florals with Nikon’s R1C1 Wireless Close-up Speedlight System in conjunction with the 105mm lens as well as ambient light when stronger shadow effects are desired. I always shoot in Manual mode and use Auto Focus, preferably in bright overcast ambient light, and adjust exposure compensation manually as necessary. All images are shot in Nikon Camera Raw (NEF) format for post-processing in Adobe Camera Raw, and editing in Adobe Photoshop. The 105mm lens also excels at portrait photography, and I use it to photograph all of my completed paintings.
For skies and landscape photography I use an AF NIKKOR 35mm f/2 D or an AF-S NIKKOR 50mm f/1.8G. When photographing reference images, I shoot hundreds of images for reviewing later using Adobe Bridge, and edited using Adobe Camera Raw and Photoshop. Only a handful make the cut – that’s just how it is. None of my working reference images are single shot keepers – all have been edited and composited as necessary using Photoshop from multiple source images to create a unique composition. Reference prints are output to a calibrated Epson P-700 10-color professional inkjet photo printer. Now that you have your recording device lets take a moment to go over a few important considerations. Nothing overly complicated here – you can get all the technical details in bewildering depth from the plethora of books on photography at any bookstore, library or online. There are however, a handful of Menu Settings I recommend you make, or change, in your camera’s software.
Image Quality & Image Size
If you’re going to be editing images in Photoshop and making prints to use as source reference, then its best to use the highest quality Image settings from the Photo Shooting Menu. To get the full benefit of all the pixels on your camera’s sensor choose the highest pixel count option available. In the Image Quality menu there are several options to choose from and since I want the best image quality the camera can provide I set it to RAW, 14-bit Lossless compressed. White Balance is set to Auto and all other settings like Picture Controls, Active D-Lighting, HDR, etc. are turned off, since none of them affect RAW images. RAW files contain non-manipulated data and require post-processing in Photoshop so the above settings affect only the images displayed by your camera’s LCD screen. Since I use Camera Raw to process my images, those other controls do not apply to me. And I also do not care much about how images are displayed on the camera’s LCD, so I leave everything turned off.
Unless you plan on using Camera Raw or Lightroom with Photoshop to process your images I recommend instead choosing the highest option, JPEG, usually named FINE. Next is the Image Size option and you want to also set that to the highest available option, usually “L” for Large. Depending on the sensor size of your camera these options produce a large physical file size – around 11 x 17 inches or larger – and at 240ppi or higher, more than enough resolution to ensure that whenever you want to enlarge or crop an image, they will contain the highest level of detail to begin with. The large size of these files means less images can fit on a memory card, but with gigabytes of storage being so inexpensive these days I wouldn’t worry about it. Just get a 32GB or higher card and start shooting. Using the settings just described, you can store more than 1,000 images in .jpeg format on a 32GB card; more than 500 images if saved in RAW format (the format I always use, more on that later).
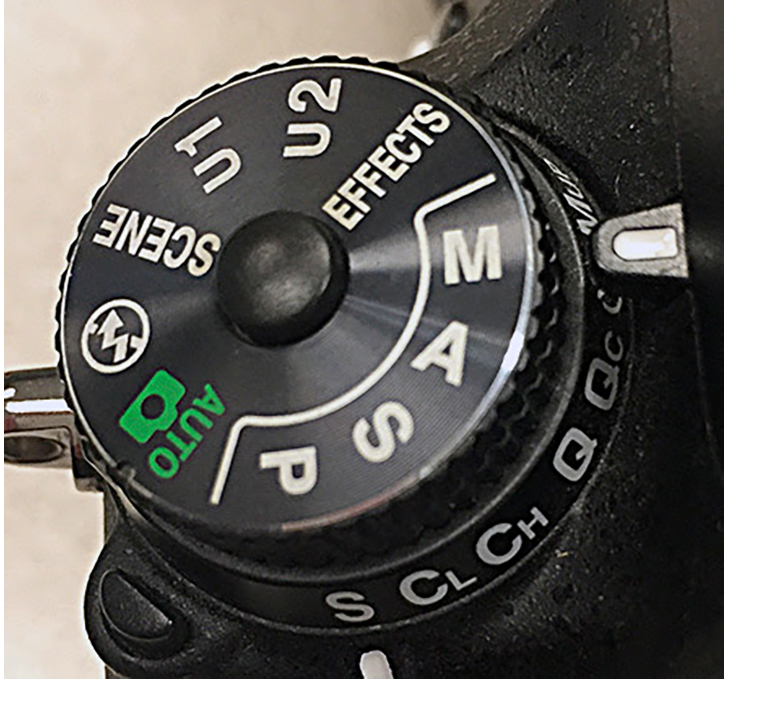
Shooting Modes
On the top of your camera, assuming you have a DSLR, is a Mode Dial. The mode that you choose with this dial determines which functions the camera will perform automatically and which will be left up to you. I prefer to shoot using Manual Mode, but if you are not comfortable shooting in Manual Mode, there are only two modes that you’ll ever need to use, Auto and Program. If you want even more creative control, you’ll want to select a mode like A (Aperture Priority) or S (Shutter Priority) that offers less automation and leaves more power and decision making in your hands. But you won’t find that discussion in this blog post. Again, the goal is to shoot high quality reference images, not win art photography contests. If you want to learn more about the other shooting modes, everything you need to know, and much more, is available online.
Auto (A) Mode
For basic snapshot-style shooting, Auto mode will be your best bet and will make your camera function much like a simple point-and-shoot camera — but one that delivers the superior image quality of an DSLR. Set the camera’s Mode dial to the green box to select Auto mode. I used to use this mode quite often and seldom missed a shot. It makes its best guess for White Balance (WB) (more on this below), and it’s usually very good. The only problem with Auto mode is that you have no control over the flash. It just pops up and fires if it feels there is not enough light and the lighting it delivers on a subject is often less than pleasing.
Program (P) Mode
In Program mode, like Auto mode, the camera chooses the f/stop and shutter speed for you. And, like Auto mode, that may be all you ever really need to know. However, if I want different apertures or shutter speeds I can, on my camera, rotate the rear command dial, which selects alternate combinations of f/stops and shutter speeds which give the same exposure. On my Nikon camera this is called this “Program Shift”, and your camera should have a similar option. You can see the apertures and shutter speeds in the finder display and goes away when you return to the standard combinations. The standard combinations are f/1.4 @ 1/8, f/2 @ 1/15, f/2.8 @ 1/30, f/4 at 1/60, f/5.6 @ 1/125, f/8 @ 1/250, f/11 @ 1/500, etc. Its easy to return to these standard combinations by turning the Mode dial to a different mode and back to P, or turn your camera off and back on.
As I mentioned, another camera feature that operates differently in Program mode than in Auto mode is the flash. In Auto mode, you have no control over the flash. It’s completely automatic and will fire whenever the camera thinks there isn’t enough light to capture a good image. In fact, your flash will pop up and snap into position as soon as you put a little pressure on the shutter release. In Program mode the flash will never automatically fire. I determine when I want a flash exposure and its a simple as pressing the Flash button on the side of camera before I shoot. The other big difference is that I can set my own White Balance depending on my weather conditions and time of day. My camera allows me to create five different White Balance presets as well as easily adjust the current White Balance — make the light appear more or less blue or orange — by rotating a couple of spin knobs.
As a realist painter, I believe the color of color of light is very important. If you work from photographic sources, as I do, observing the quality of natural light in your source material and capturing it successfully will greatly enhance how you express those qualities in paint, especially in the shadows. Although this website and blog is about painting, not photography, I feel compelled to speak at length about these technical issues related to your camera to help get the most out of the time you spend collecting source material. High quality source material straight of the camera is always preferable before starting any image editing.
Lastly, there are two other Shooting Modes worth mentioning:
1. Shutter Priority Mode (S).
Shutter Speed is one of the three exposure controls – Aperture and ISO are the other two – that your camera uses together to create an image. The shutter speed simply controls the amount of time the shutter is left open for light to come in and hit the sensor. This can be used to great advantage in sports photography for example, when you want to freeze motion using a very fast shutter speed. Another example would to purposely create a sense of movement and blur like when shooting a waterfall. Shooting static rocks and trees and moving water at a slow shutter speed setting gives a silky look.
2. Aperture Priority Mode (A).
Put most simply – Aperture is the size of the opening in the lens when a picture is taken. The aperture that you set impacts the size of that hole. The larger the hole the more light that gets in – the smaller the hole the less light. Aperture is measured in f/stops. You’ll often see them referred as f/numbers like f/2.8, f/4, f/5.6, f/8, or f/22, for example. This is important because changing the aperture of your shots will, among many other results, most noticeably effect your depth of field.
Depth of Field (DOF) is the amount of your framing that will be in focus. Large depth of field means that most of your image will be in focus whether it’s close to your camera or far away and small (or shallow) depth of field means that only part of the image will be in focus and the rest will be soft and fuzzy. Aperture has a big impact upon depth of field. A large aperture (smaller number like f/2.8 or f/4 ) will decrease depth of field resulting in softer out-of-focus backgrounds while a small aperture (larger numbers like f/16 or f/22) will give you larger depth of field resulting in everything being in sharp focus. Small numbers mean small DOF (soft backgrounds) and large numbers mean large DOF (sharp backgrounds).
For many years I shot mostly flowers, since that’s what I was painting then, and portraits. Aperture Mode was an excellent shooting mode for both. Whether I shot a “portrait” of a blossom or a person, a soft blurry background – or shallow DOF (depth of field) – was desirable because the background isn’t competing with the subject. A shallow depth of field makes the subject, in this case a blossom or a person, stand out in the image. Essential characteristics are sharp and an in focus, with the out of focus or “bokeh” background serving as a curtain backdrop. So, in Aperture Mode, by setting a low f-stop number like f/2.8 or f/4, the camera will helpfully set the shutter speed for a correct exposure resulting in a sharp foreground and soft background. Sometimes I want everything to be in focus with little or no depth of field, like a bouquet of cut blossoms under controlled studio lighting and a flash. For this type of shot I would dial in a high f-stop number like f/16, which pretty much puts everything in focus. This way I can always selectively choose parts of my image to manually put out of focus when I edit the image in Photoshop, to draw attention to and direct the eye as necessary to certain parts of the image while ignoring others.
Manual Mode
I have enjoyed photography and shooting images for more than 50 years, ever since I was first introduced to professional SLR film cameras in high school. My first camera was an Olympus OM-1MD film camera with 50 mm f/1.8 lens, which I replaced with a Nikon F3 SLR film camera and Nikon 50mm 1.2 for general shooting, and an 85mm 1.2 portrait lens – quite expensive photo gear back in 1980. After a brief interest in B&W photography and darkroom techniques I switched to shooting only slide film, specifically Fujichrome Sensia 200, which produced gorgeous color images. These were fully manual cameras with no digital options whatsoever including manual focus and no image stabilization technology. Through years of trial and error, lost expenses and wasted slide film development one learned the best combinations of f-stops, shooting speeds and ISO settings to produce properly exposed images in various ambient light conditions. To this day I prefer and continue to shoot in Manual Mode using pretty much the same settings (ISO 200), and switching on the technological marvel of auto-focus and image stabilization.
It’s actually very simple to shoot outdoors using Manual Mode. Pre-digital film cameras required having film developing and prints or slides made, which took several days, incurred a cost and you hoped that at least a few of those 24 or 36 images were keepers. All modern digital cameras offer an instant preview via a built-in LCD on the rear of the camera body. You know right away if the image is over- or under-exposed and simply adjusting the f/stop or shutter speed will correct the problem right away.
Higher shutter speeds freeze action and wider apertures create a pleasing blur.
When you take a photograph, the camera’s photo sensors are exposed to light. There are three parts to exposure: ISO, shutter speed and the aperture.
• The ISO controls the the amount of light by the sensitivity of the sensor
• The shutter speed controls the amount of light by the length of time
• The aperture (size of the lens opening) controls the amount of light intensity via a series of different sized openings
The ISO camera settings will tell the camera how much light it requires to be able to produce an image. In other words, it is the amount of light needed to create a photo. It also means that the higher the ISO number, the faster the shutter speed you can use in low light situations using the same aperture. See examples below:
ISO number Shutter speed increase in exposure:
ISO 100 f/5.6 aperture at 1/30 sec shutter speed (will most likley result in a blurry image)
ISO 200 f/5.6 aperture at 1/60 sec shutter speed
ISO 400 f/5.6 aperture at 1/125 sec shutter speed
ISO 800 f/5.6 aperture at 1/250 sec shutter speed (will result in a sharp image)
A doubling of the ISO value will double the shutter speed resulting in a sharper image. Used in lower light situtations this is desirable but using an ISO of 800 and higher, significant “noise” will be introduced into the image resulting in noticeable graininess.
A simple rule that I learned a long time ago is that on a sunny day if you want a deep DOF (Depth of Field – sharp focus throughout), you should get correct exposure with camera settings of aperture f/16 and shutter speed as the inverse of the ISO (film speed). So, for me, with an ISO of 200, the shutter speed should be 1/200. At ISO 400 – a good setting to use if you plan to shoot indoors or in low light conditions – the shutter speed would be 1/400 and so on. If you wanted a shallow DOF (out-of-focus background)at ISO 200, then, since f-stop and shutter speed are inversely proportional, you would use an f-stop of 5.6 and shutter speed of 1/1600 – a change of 3 standard stops – and so on. It can, unfortunately, get more complicated. For example. using the previous set-up at ISO 200, if I wanted to use an f-stop of 2.8 for a very soft background then I would have to use a shutterspeed of 1/6400 which is off the charts and not possible at ISO 200 on the D750. In that case I would first have to reduce the light sensitivity by 1/2 to ISO 100, which would allow me to set a shutterspeed of 1/3200.
On a cloudy or overcast day I usually shoot 1/160 @ f/8 – if you need to adjust the DOF, then the same rules apply as in the previous example. Sounds simple right? Well, you’ll figure it out eventually and it will become second nature. More in “A crash course on using a digital camera – Part 2”.